• Home
  • About Us
  • Projects
    • Grey Mini Project
    • Peugeot 205 GTI Restoration
    • 1969 Mini Cooper Project Description >
      • Blog for Mini Cooper Restoration
      • 1969 Mini Cooper Before Pictures
      • 1969 Mini Cooper During Pictures
      • 1969 Mini Cooper Finished Pictures
    • 1975 Mini Pick Up
  • News Blog
  • Contact
Born Again Cars

The Left Front get's the grinding and welding treatment.

4/29/2010

0 Comments

 
Picture
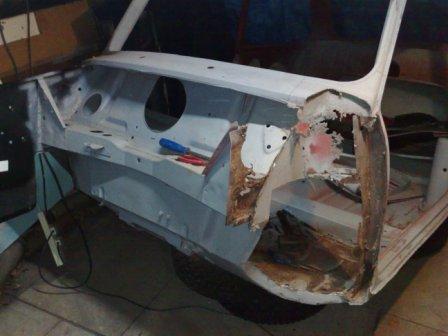
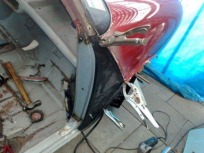
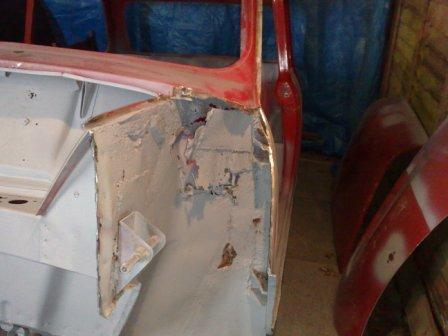
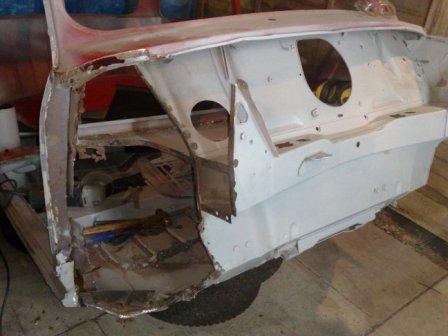
So, it’s time for the left front corner to receive the same treatment as the right.

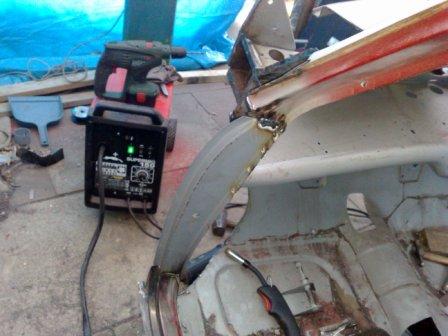
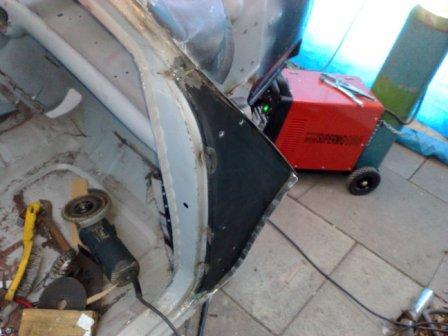
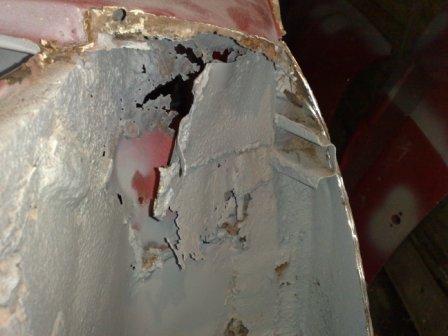
First up is the big strip back, as before I have carefully removed all the rotten metal, back to the panels that that remain solid, I’ve been careful with the grinder not to damage the return elements of these panels, so I can weld the new ones in, using the same joints as would have been there when the car was new.

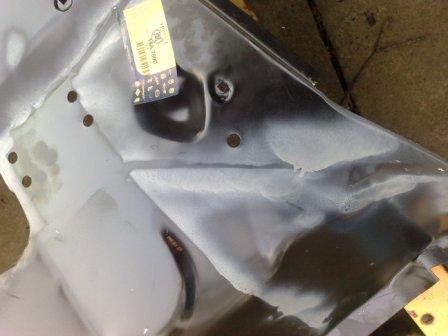
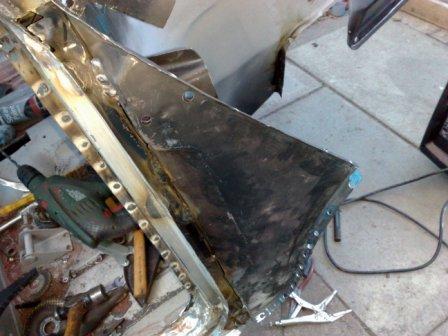
In this third picture and the ones below you can see the extent of the strip back on this side, with virtually the whole “A” pillar being removed. 

It might look extreme but even with all this structure taken out the remaining parts are not really flexible at all. This is another advantage of tackling this type of work in bite size chunks. It leaves as much of the car as possible supporting the area that’s receiving the attention. If much more had needed to come out, I would have either needed to split this area into a smaller section (replacing the inner wing before tackling the door shut for example), or I would have needed to brace the opening to ensure it would not distort during the whole process.
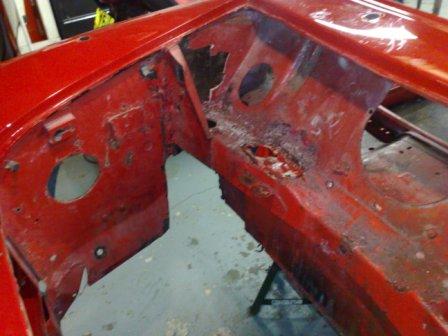
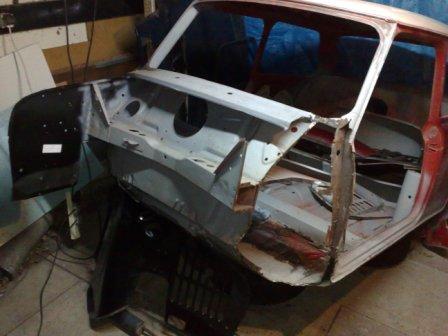
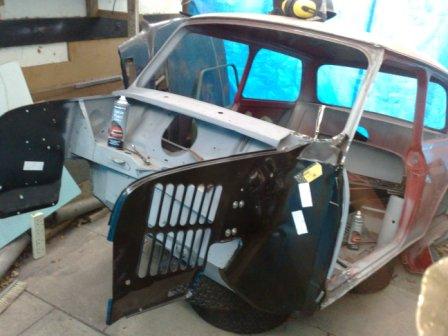
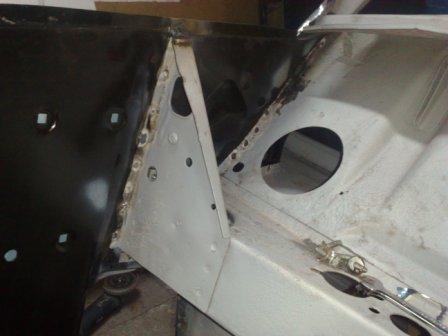
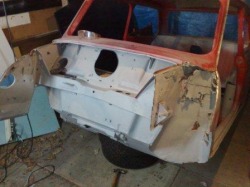
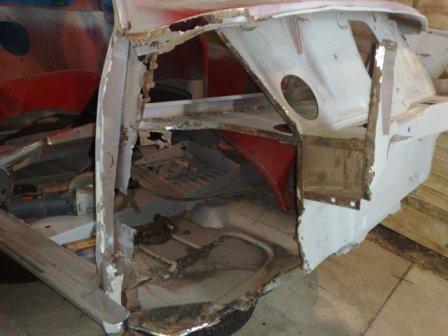
Then it’s time to start adding the new panels. The door shut is the first part to go in, although its location was quite obvious, I did carry out an over check by offering the door into position before, during and after welding it into place.

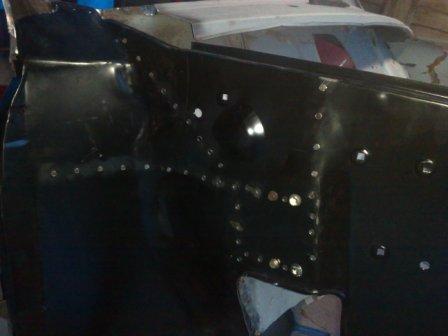
Once this is in place it’s time for the inner wing. I use the same “puddle” welding technique as described in my previous post. And repeating the process from the other side, I have bolted the inner wing securely in place at the suspension bracket fixing points, which in this case is nearly enough to position the entire panel. Just a couple of grips keep the rest tight to the car along all the other joints. Here we are – it’s tip of the day time! Always check the position and tightness of the joints during the welding process, the heat can distort the panels (both new and old) so it’s important to keep an eye on what’s happening so you can react to it before everything is too solid.
Picture
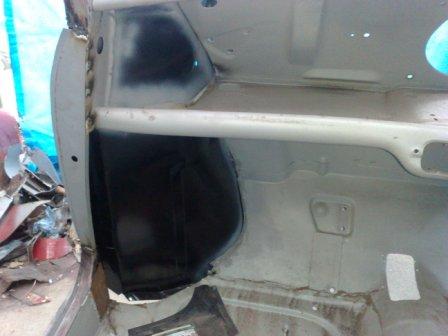
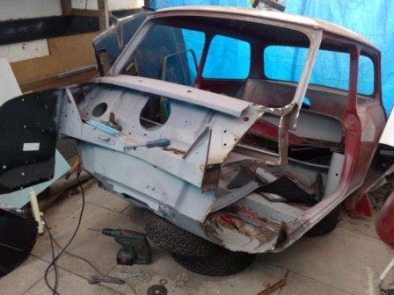
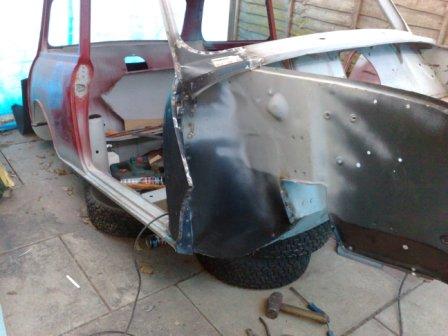
The inner and outer “A” panels are then added along with the scuttle repair panel, and there is a little "in-fill" plate that sit's under the end's of the scuttle panel (which incidentally wasn't evident on this side in the mess that was removed, perhaps a reason for the rot having got a little further here than on the right side?). And that’s it! The left side is now up to the same standard as the right.

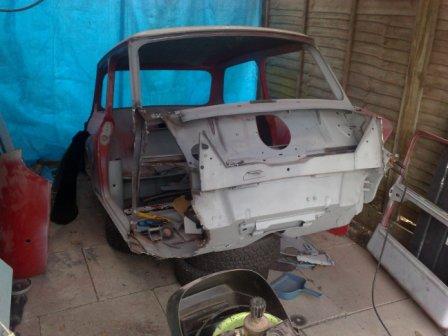
The last thing I have managed is a quick alignment of the whole front end. I have bolted the front sub frame into place, and am using that as the jig for the location of the front panel, I can then offer the wings into position and hold them in place with grips, finally the bonnet is rested in place to make sure the shut lines will be true, and there you have it, a front end again (although not that solid just yet!)


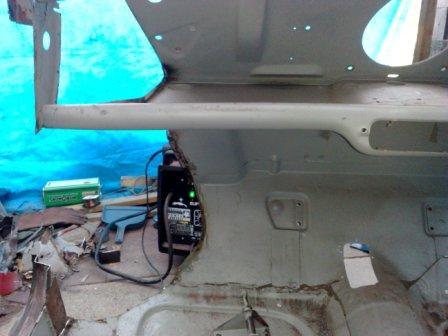
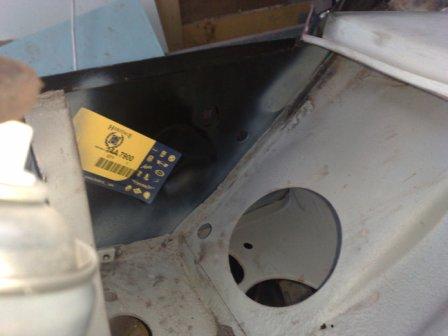
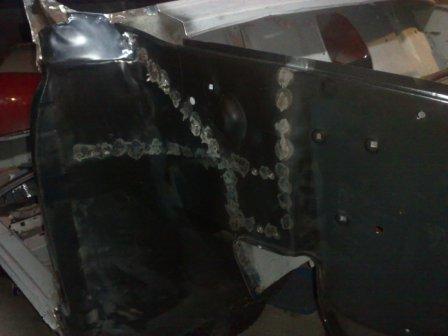
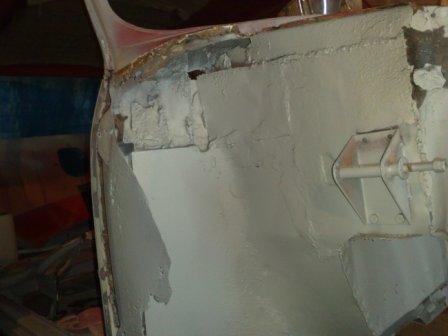
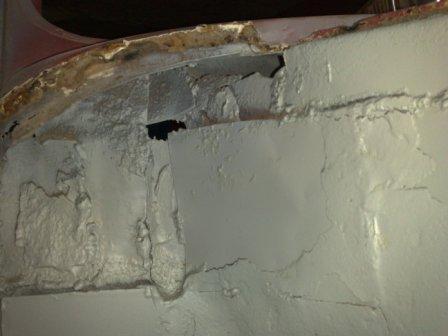
Before welding there is a little bit more dressing back of the joints to be done, to remove the last of the old panesl and the holes for the puddle (or spot) welding need to be drilled. I will also seal the seams that are difficult to reach once the outer panels are back in place. But that will have to wait for another day.

0 Comments

Right Front Is Comming Together

4/25/2010

0 Comments

 
Ok, so, to carry on from where I left off on the last post, the front panel and front wings were removed and I had pretty much cut out all the bad bits from the right-hand inner wing.

The next job is to put the new inner wing in place and check it for a good fit. As you will see in the subsequent pictures, it's a very good fit indeed. Which is my tip for the day, with big, complicated panels I’ve found it's a false economy to buy anything other than Heritage Ltd parts. This is because they use the original BMC drawings to produce their stamping tools, so the parts are as close to the originals as you are going to get. For small or mainly flat panels you are fine to go with the cheaper brands, but the last thing you want if you're into a major restoration, is to have to take extra time to make the new parts fit.

So once clamped in place it's time to mark out where the spot welds need to go. The method I use is to spray round the edges of the joints with primer. Then when removed this provides a nice 'map' of where to drill for the welds. (as shown in these two pictures)
My spot welds are also called puddle welds, this is where you drill a hole in the panel of one side of the joint and when clamped in place fill the hole with weld making sure you get good weld penetration into the panel below that hasn't been drilled. This gives the same effect as the original spot welds, but they are actually significantly stronger (because they are larger) so fewer are required. For extra strength you can also stitch weld along the edge of the panels (also known as seam welding) but this is only required in particularly structural areas or if the car is to be used in some kind of competition. For this road car restoration I’m trying to keep as original as possible so I’ll only use seam welding in places where it was used on the original car.

Ok, so here are some step by step pictures showing the various stages for fitting and welding in place the new right front inner wing…..
1. Drilled         2. Welded (shown from the outside)   3. Welded (shown from the inside)   4. Ground (ready for primer)
Picture
Next up is to get the inner A panel into place, this is a critical part as it has a number of alignment jobs to do. It places the door hinges as well as fixing the position of the back edge of the front wing.

I hold everything into place using Grips and Clamps and even lift the door into place to check the closure gaps and hinge hole alignment, before finally making the first weld. Once held on with a few small welds the clamps can be removed and the alignment checked again. Once I’m convinced all is ok, it’s time to make it permanent by adding the rest of the welds.

Note in the next picture the use of seam welds by the hinges, as already mentioned seam welds are used in more structural areas, and this is one of them. It has to take the weight of the door when it’s open so the extra strength should stop any movement at the base of the hinges.

Note I’ve also drilled the flange ready for the outer A-Panel.

Before fitting the outer A-Panel I give all the areas that will be hidden a generous coating of corrosion protection (including the inside of the outer panel). Then it’s time to fit the outer panel and the right hand front piece of work is pretty much complete….. Phew!
A nice change from where it was before!
0 Comments

The Body Shell Returns!

4/15/2010

0 Comments

 
Here we are, the body has returned from the shot blasters, the paint and filler and mess has been removed to reveal the "real" car beneath, which shows both the good and the bad in all their glory! Once stripped it's been blown over with a coat of primer to protect the bear metal from light surface rust.

Like the engine I'm going to tackle the body in sections. This will help keep the shell as rigid as possible when the rotten elements are cut out (I might need to make a jig to keep everything straight for some jobs too). It will also help my motivation, because, by keeping to manageable small sections of work, I can see the progress being made on a daily basis.

So, the front end is going to be the first job. The front panel and the front wings are much newer than the rest of the car and they can be reused, but in order to replace the inner wings and "A" panels they first need to be carefully removed.
I do this by grinding through the panels that are to be replaced and then once off the shell, I can clean up the details ready for re-fitting.

Once the outer wings are removed the full extent of the rotten inner wings is revealed!
Picture
The cutting and grinding continues, I've tackled the right hand side first, and this reveals the extent of the patchwork that has been added over the years to keep the MOT men guessing! It would appear that nothing has ever been cut from the car, it's simply been patched from the outside and then patched again from the inside, and when the patches have gone rotten it's been patched again! In some places it's 5 layers thick! The weight and shear quantity of metal being removed is quite incredible.

Fortunately the rot is just about restricted to the inner wing panel and these are available complete from "Heritage Ltd". However it has eaten into some of the scuttle, for which there are convenient repair parts available. Plus the front of the door shut is not too great either, again a repair section is available to save having to remove and replace the whole part.

So once all the old rusty parts a re removed there's certainly a big hole!

0 Comments

Gearbox here we go!

4/10/2010

0 Comments

 
It's been a busy few days! This update will take you through the gearbox rebuild, and the re-assembly of the engine (head block and gearbox). After this I have another exciting update to take you through as I've had the excitement of getting the shell back from the shot blasters. So I can show you a few interesting bits and pieces that will definitely need some attention!

But first things first, "The Gearbox".

Having split it from the bottom of the engine before reconditioning the block and bottom end, the first job was to completely strip all the components and assess them for wear.
Although I found a missing thrust washer on the crank for the primary gear, which explains some of the whining noise, I still need to make sure there are no other maladies deeper inside the box itself.

The first of those maladies became evident very early on, the outer input shaft (1st motion shaft) bearing was starting to disintegrate, that is the plastic carrier for the rollers was in pieces, luckily the rollers were still in place and there was no sign of damage to the shaft, so a new bearing, complete with the race that sits in the clutch housing was sourced.
Picture
Gearbox Internals Ready for Cleaning and Inspection
Once all the parts were removed (see pic) the inspection continued. The baulk rings all appear fine, very little wear (confirmed by the fact that there were no gear selection issues when driving the car). The other bearings were also all ok, until I got to the ones inside the lay-shaft (2nd motion shaft), they were showing quite a bit of pitting and I know they are a Mini weak link, so I've replace both of those too. Otherwise, all the gears are fine, the shafts don't have any wear either. the selectors, detent springs and detent balls just needed to be dug out of the sludge in the bottom of the casing (here’s an obvious tip, make sure you have all the exits covered when you put an airline into the hole to help move the stuck detent balls! if not the best that will happen is you will be showered in oily sludge but that will seem minor if you get shot by a ball that you have missed!)

Once apart everything was cleaned thoroughly (good old Nitro Morse to the rescue once again), the empty casing also had a jet wash before being thoroughly dried.
Picture
Picture
Re-assembly started with the selectors, just a little grease on all the moving surfaces is enough, after all everything will be submerged in oil down here in the bottom of the sump well before the engine is started.

Then the output (or 3rd motion) shaft is re-assembled. It's worth knowing that unless you're changing the big primary shaft bearings the Mini gearbox can be re-build without the need for a press. This is becaues the gears and syncro hubs are retained by an ingenious spring and plunger arrangement in the base of the shaft splines, it's a bit of a fiddle to assemble, but it works really well. I guess it's a system that's too expensive in today's manufacturing world (it requires a drilling in the shaft, a spring, ball, plunger and special washer, as opposed to a press fit) but it certainly makes re-conditioning a doddle.
Picture
Selectors reassembled
Picture
1st gear going onto the output shaft
Picture
The complete output shaft (gears and syncro hubs)
So once the shaft is back together, it's time for the major re-assembly to begin, making sure to trap the oil pick up strainer into the casing before the lay shaft is fitted (it's a big job to fit if you forget it and find it on the bench at the end!)

Once it's all back together it's ready for re-assembly to the block then the whole assembly gets turned back up the right way and the head can go on!

With nice clean aluminum clutch casing and gearbox married to the shiny green block and head, it's all starting to look rather special! (even if I say so myself!)
Picture
0 Comments

Cylinder Block and Bottom End.

4/4/2010

0 Comments

 
So here we go with the Cylinder Block and bottom end.

I've stripped the assembly completely, and then finished the cleaning process by removing all the old paint from the outside and all the oil staining from the inside with Nitro-Morse (yep, the stuff you use for stripping paint off your banisters!)

There was one nasty surprise. When removing the clutch and flywheel assembly, the "C" ring and washer that is supposed to retain the primary drive gear on the crankshaft was missing completely! Just not there? It appears this has allowed the gear to move in and out on the end of the crank shaft which in turn has bashed the thrust washer that sits behind the gear into pieces, which are now sitting in the bottom of the sump! Fortunately neither the gear or the crank are damaged, but I wouldn't mind guessing it's what was causing the extra whining noise, as it can't have been meshing properly with the idler gear? Hopefully it hasn't damaged anything in the gearbox. (in Mini's you might know, the gearbox sit's in the sump below the engine, sharing the same oil and in this case the same debris!)

Luckily that was the only surprise. The other - more expected - areas that needed attention were the Main bearing shells, they have been replaced, the bores which needed a flexi hone, and a corresponding new set of piston rings. Oh yes and the cam followers are worn enough to require replacement too.

On the up side, the cam shaft itself is hardly more than run in, and that goes for the big end bearing shells and the timing chain as well. I think this points to the engine having been opened before (this is also evident by the used tab washers throughout). But why someone would replace a cam shaft and not the followers is beyond me? (Although apparently not beyond someone that forgot to fit the 'C' ring and washer on the end of the crank? Enough said). The pistons, now the lacquer has been cleaned off look like new, as do all the other smaller components and covers etc.

I've bought a new oil pump new timing chain tensioning rubber rings and a selection of new nuts and bots as a matter of course.

As you can see in the pictures below, not only has the engine bottom end been stripped, cleaned and inspected, it's actually all back together again and looking resplendent in it's original BMC green engine enamel paint.

Next job is the gearbox, where the strip down is well underway, so I'll update you on that very soon.

Thanks for looking!
0 Comments

Cylinder Head

4/4/2010

3 Comments

 
It’s all going on now!

I’ve decided to tackle the engine re-build in stages, I’ll do the Cylinder Head first, then the Block and finally the Gearbox. This means I won’t fill the whole garage with a ton of bits in one go!

So as you can see from the Pic’s the head is already nearly finished, Removing it from the engine was pretty simple. I’ve kept the rocker shaft together, and poked the push rods through a piece of cardboard with numbers on to keep them in order.

I’ve then removed the valves (the springs needed a little tap with a plastic mallet to free them from the retainers), but other wise they cam out without issue.

The stem seals, basically little ‘O’ rings on these early cars, are all either badly perished, very hard or missing completely, which nicely explains the whiff of oily smoke on start up. Fortunatly the gasket set comes complete with a nice new set.

The valves and valve seats are all fine, they’ll needed lapping in again of course, but there are no burn marks or pitting. I’ve decided to keep the seats that are in the head, so will need to continue to run with the lead fuel additive, partly to keep the originality and partly because there is nothing wrong with the original parts, so I’m using the “if it isn’t broken don’t mess with it” rule.

One thing that will need fixing though, is one of the spring seats. The head has obviously been in bits before and has had a washer used in place of one of the seats, which, because it’s not hardened has badly deformed. So I’m trying to source an original part, but it’s not proving that easy!

The rest of the valves are however back in place and it’s had a coat of the proper BMC Green Engine Enamel/ Along with the rocker cover it now looks smart and new.

So… next up is the bottom end, Cylinder Block, Crank and pistons
3 Comments

    Author

    Rob Russell.
    Learn all about me, just click here

    Archives

    May 2012
    April 2011
    September 2010
    August 2010
    July 2010
    June 2010
    May 2010
    April 2010
    March 2010

    Categories

    All
    Body
    Engine
    Engine & Gearbox
    Interior
    Suspension
    The Beginning

    Click to follow the Blog  on Twitter

    RSS Feed


    Home
Powered by Create your own unique website with customizable templates.