• Home
  • About Us
  • Projects
    • Grey Mini Project
    • Peugeot 205 GTI Restoration
    • 1969 Mini Cooper Project Description >
      • Blog for Mini Cooper Restoration
      • 1969 Mini Cooper Before Pictures
      • 1969 Mini Cooper During Pictures
      • 1969 Mini Cooper Finished Pictures
    • 1975 Mini Pick Up
  • News Blog
  • Contact
Born Again Cars

Great pictures of the 1969 Mini Cooper

4/19/2011

0 Comments

 
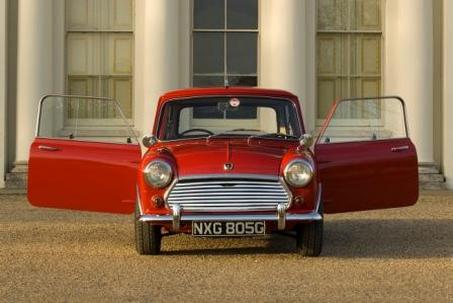
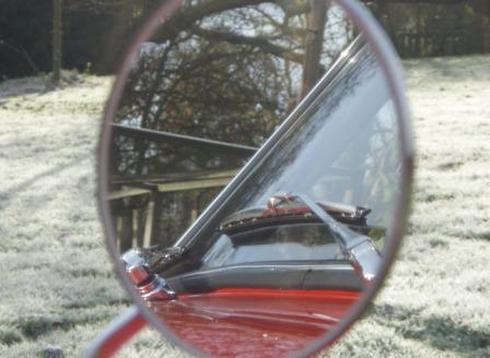
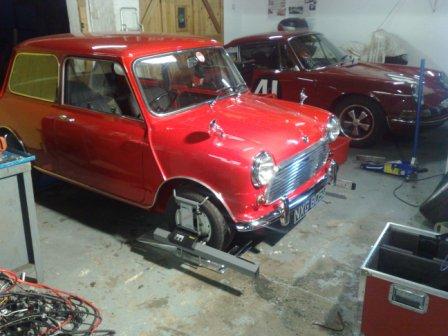
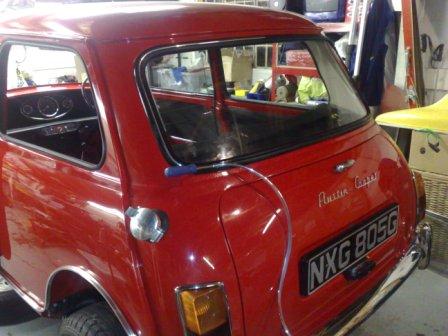
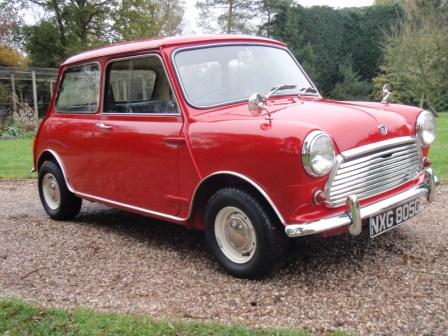
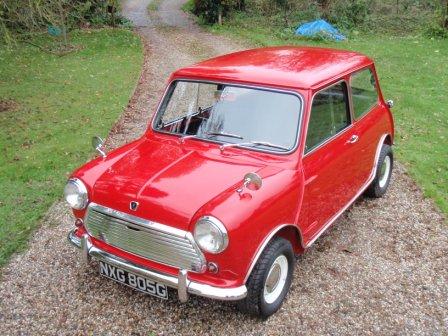
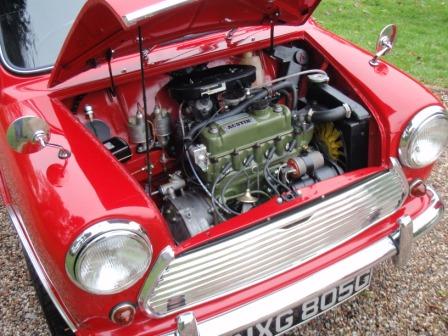
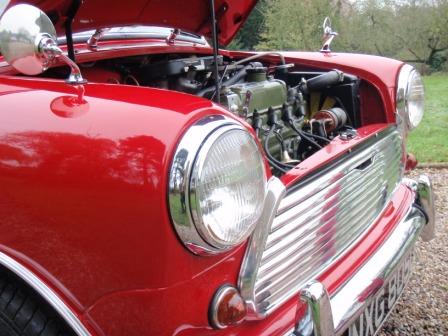
Click this picture to take a look at some high resolution images of the finished Mini Cooper.
Many thanks go to my good friend Nick Bilsborrow for the awesome "launch quality" shots.
Picture
0 Comments

1969 Mini Cooper Finishing Touches - The Final Pieces

4/17/2011

1 Comment

 
Picture
So here I am, at the end of the project to restore the 1969 998cc Mini Cooper. It's taken rather longer than predicted, but that's down to other commitment on my behalf rather than too many un-expected findings on the car.

In summary, the level of body shell re-construction was pretty major, and was the largest part of the work load. The Engine, Gearbox, Suspension and Interior were all pretty straight forward (apart from that brand new but faulty spark plug that sent me on a wild goose chase through the ignition system for a while!)

There remain just couple of bits left to take you through, to make this a full and complete story! Reading back through the pages I have realised I did not cover the fitting of the boot seal, not the most exciting part, but worth a mention none the less, because it's a fiddly job and I don't know of anywhere on the internet that has pictures showing the orientation of the little clips. So here are a couple of shots to fill that gap!
The new seal also resulted in the boot being very tight to shut. However with compression over time this has improved a lot.

The last job to do before going out on the road was to fully set up the wheel alignment, on a Mini this is pretty straight forward. Only front tracking adjustment is readily available, however, after such a comprehensive restoration I always check all the parameters to make sure they are within the manufacturer specifications.
In this case everything was spot on (a testament to the careful body restoration), however if adjustment would have been required there are various ways to compensate by adjusting the brackets that hold the suspension to the sub-frames. Below are the pictures of the car with the laser alignment equipment attached (not very "period" but it's the best equipment for accurate alignment).
And that pretty much sums it all up! If you have any questions or would like to ask for any advice etc please do get in touch. The car is now up for sale, so again, please do get in touch if you're interested. There will be an E-Bay classified advert posted tomorrow.
I have some more High-Resolution pictures to upload very soon, I will update the blog when they are available.

I have now turned my thoughts to the next project. There is a Golf Gearbox rebuild for a friend that I am already working on (I have pic's and will share them on here). But the next car-sized job I'm lining up is perhaps a little daunting, and definitely a "big one"! See if you can recognise it from the cryptic shots below. I have only taken a look so far, if all goes to plan, I hope to pick it up in a month or so. Then I can reveal all the details!

As always, thanks for reading.
Rob.
1 Comment

Finished 1969 Mini Cooper Pictures Available

4/8/2011

0 Comments

 
I have just uploaded a few pictures of the finished car, Click Here to see them.
There are some more to follow and I will also finish the final part of the restoration story very soon

Thanks!
0 Comments

Finishing Touches - Interior

4/6/2011

1 Comment

 
Picture
The last time I wrote about the interior the dashboard binnacle had just been wired and I had fitted the steering column, the next job was to fit the head lining. The original lining was badly torn and very tired so I sourced a new, original specification "Crinkle Effect" part. On the older cars Mk 1 and Mk 2, the head lining is attached to two frames that link in the middle on hooks, the later cars had a single piece lining on a wired frame.
The first job was to strip the old fabric from the two frames and give them a clean. I then marked the center of the new lining and cut the retaining strips to clear the middle rib of the frame. I could then staple the retaining strips together to hold the lining to the frame, being careful to pull the fabric as tight as possible while fitting the staples.
Next I removed a small section of the retaining strip near the edge, this allows the lining to pull up tight into the bends at the edge of the frame. The shape of the removed part is also shown in the first picture below.
The edges and the front and rear require gluing with spray contact adhesive before being held in place with small clips, this is a fiddly operation as again it's important to pull the lining as tight as possible before fitting the clips, and it's also important not to get the glue on any of the visible surface.
Once complete the second frame was re-covered in the same way and the finished part is refreshingly and bright and clean.
With the new fabric in place it was time to fit the lining to the car. This is really very straight forward, it is simply pushed into place and is held by the ridge at the top of the body work.
With the rear half in place the interior light could be fitted and wired and then the front section was pushed into place and linked to the rear using the hooks on the frame.
With the lining in place I could then fit the trim-work round the rear window, this is in the same material as the rest of the lining and came as part of the replacement kit, although this being Mk 2 with the larger rear screen the side parts did need a little modification, but the edges all fit under the window rubbers so this did not present a problem.
With all the trim in place round the rear screen, the next job was to fit the screen, which is the final piece in the puzzle to hold it all together.
I like to use the "string" method for fitting screen rubbers, I know there are various techniques, but this one has always worked for me, although I use a length of washing line rather than string (the plastic coating helps prevent damage and it's a lot stronger than string.
First I for the rubber to the glass, then I fit the line to the groove in the rubber that is going to fit to the body. I then place the assembly into the window aperture, and push it home along the lower edge. Up until this point it's all a bit of a balancing act, but once in this position it's all fairly stable and can be worked on carefully.
By pulling the line from inside the car, it forces the rubber seal into place, it can be quite hard work at the corners and does require a few pushes from either side to make sure the glass is heading in the right direction. The pictures below show the job in progress. 
With the rubber and glass in place the final piece is the trim strip, this not only is the finishing touch for the eye, but it also expands the rubber to hold the screen tightly in place. The special tool is a must here, the first time I fitted a screen it took me about three hours and a whole lot of finger ache with a screw driver wrapped in cloth for protection. I then invested about £5 in the proper tool and it now takes about 10 minutes with no risk of damage!
Once in place it's time for a cup of tea and a look at the finished job, from inside and outside!
The next job is to fit the seats, and trim out the doors. The car came with freshly re-covered seats, so I don't have any work to do on them, and they are simple to fit.
I now move onto the front screen, which means fitting the black vinyl trim on the interior, this was another Cooper feature, and would also have included black plastic surrounds for the screen vents (which I have yet to source).
The vinyl trim is glued in place with contact adhesive and then held by the screen rubber and small metal clips under the dash board.
The final operation to complete the interior is to fit the new carpet, this really sets it off and gives is a great "as new" feel.
1 Comment

Finishing Touches - Engine

4/6/2011

0 Comments

 
Well it's been a long time since I last updated the Blog, but that's kind of the nature of a project like this, it can be put on the back burner when other things take over.
In fact the project has carried on, it's the blog updates that have suffered from the back burner treatment! So I plan to take you on a whistle stop tour of the last six months!
I'll split it up into bite size chunks of Engine (firing up and tuning etc) - Interior (fitting out the "soft furnishings") and Body - (the satisfaction of adding all the bright work and shiny bits etc).
But first to get the ball rolling, here are a few of the latest pictures, showing the finished article in all it's restored glory...
Picture
In the last Blog update the engine was just about ready to fire up, all that was left to do was a little plumbing, and that included the interior heater.
This was in a bit of a state, fortunately only cosmetic, so a strip scrub and paint of all the components was necessary. I also air pressure checked the matrix using an air line and a bucket of water to make sure there were no leaks or weeps.
Once the heater was fully restored the last of the cooling plumbing could be finished. 
So the time had come to crank the engine and see if it would come to life!
The sequence for firing a fresh engine is quite critical. After filling with oil, I removed the spark plugs and spun the engine on the starter. Without the plugs there is no compression so the loads on the bearings, that are yet to be filled with pressurised oil, are as low as can be and the engine also spins a lot faster which gives the oil pump the best chance of sucking oil up from the sump

During the engine build I had packed the new oil pump with grease to make sure it would have the best suction possible, and sure enough after a little while the sound of the engine turning changed, and the oil pressure gauge flicked into life. Stag one complete.
I then carried out a compression check on all four cylinders, This is partly to make sure everything is working properly, but it also gives a reference value for each cylinder should there be any issues later. They are all nice and high (as you would expect with a newly honed block and freshly lapped valves etc), and also very nice and even across the cylinders.
Stage three was to prime the fuel system, so the pump was connected, and at key-on that gave a satisfying click-click-click, until the pressure built up and the clicking slowed to a stop. A quick check all round for any leaks (fuel, coolant or oil) and we were ready for the big moment!
Sure enough, a couple of cranks was all it took for the engine to fire, all be it a little rough, but it was enough to get it warm and carry out an initial timing check.
Just as I was about to turn it off, there was a big hissing noise and some steam fom near the water pump! Not Good!
I turned it off and an investigation revealed that the small hose between the water pump and cylinder head has burst along it's seam! (it was of course brand new, so I was very dissapointed it had failed on it's first use!).
This would mean a Head-Off repair! A few explitlves, and about an hour and a half later the head was on the bench.
I had left the spigot alone when rebuilding the head because they are notoriously difficult to remove, but it appears the route cause of the failure was the slightly eroded spigot, being shorter than it should have been the clamp had pinched the hose on the sharp end of the spigot, initiating the split (so my fault after all)!
Just to be sure I bought a silicon hose to replace it, not exactly original, but much stronger than the standard rubber part, and hidden from view once in the engine bay. 
I then went about the removal of the spigot. It was completely corroded in place, which meant it had to be drilled out and subsequently tapped to a larger than standard M16 thread. I made a new spigot on the lathe from an M16 bolt and secured it in place with thread sealant. Before re-fitting the head (using a fresh gasket of course).
After following the same procedure again, the engine was back up an running once more.
It took a fair amount of tuning and fiddling with the SU carbs (mixture, balance and engine speed), to finally see the car running smoothly.
I finished all the other jobs, which I will cover in my next updates, but to finish the engine section i should tell you about the first test drive. Unfortunately this wasn't as smooth as it could / should have been, the engine was very hesitant under load, missing quite badly on one or two cylinders.
I first tried a different coil, which had no effect, then I swapped the HT leads, also no effect, I then fitted a new distributor, which frustratingly also did not fix the problem (although it did make the off-load running spot on, and is now the correct part for this age of Mini Cooper).
I finally decided to change the spark plugs (they were already new during the re-build), and that's what made the difference!
It appears that two of the new plugs were breaking down under load, not something that I have ever come across before, and they were a good brand too?
So finally I had the engine running as it should! Sweet through all speeds and loads, I have since traveled about 300 miles in the car to help bed in the bores and check for any little issues, but there has been nothing.
So that was the engine story, next I will update you with the interior build, thanks for reading!
0 Comments

    Author

    Rob Russell.
    Learn all about me, just click here

    Archives

    May 2012
    April 2011
    September 2010
    August 2010
    July 2010
    June 2010
    May 2010
    April 2010
    March 2010

    Categories

    All
    Body
    Engine
    Engine & Gearbox
    Interior
    Suspension
    The Beginning

    Click to follow the Blog  on Twitter

    RSS Feed


    Home
Powered by Create your own unique website with customizable templates.